بسم الله والحمد لله والصلاة والسلام علي رسول الله وآله وصحبه وإخوانه وسلم
How Analog Phone Works
Inside a Telephone
The very simplest working telephone would look like this
inside.
As you can see, it only contains three
parts and they are all simple:
A switch to connect and disconnect the phone
from the network - This switch is generally called the hook switch.
It connects when you lift the handset. On hook means that the circuit is opened.
A speaker - This is generally a little
50-cent, 8-ohm speaker of some sort.
A microphone - In the past, telephone
microphones have been as simple as carbon granules compressed between two
thin metal plates. Sound waves from your voice compress and decompress the
granules, changing the resistance of the granules and modulating the
current flowing through the microphone.
That's it! You can dial this simple phone by rapidly tapping
the hook switch -- all telephone switches still recognize "pulse
dialing." If you pick the phone up and rapidly tap the switch hook
four times, the phone company's switch will understand that you have dialed a
"4."
The only problem with the phone shown above is that when
you talk, you will hear your voice through the speaker.
Most people find that annoying, so any "real"
phone contains a device called a duplex coil or something functionally
equivalent to block the sound of your own voice from reaching your ear. A
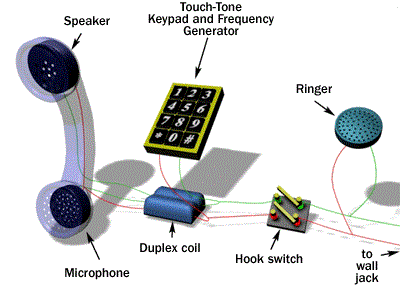
modern telephone also includes a bell so it can ring and a touch-tone
keypad and frequency generator. A "real" phone looks like
this.
Still, it's pretty simple. In a modern phone there is an
electronic microphone, amplifier and circuit to replace the carbon granules and
loading coil. The mechanical bell is often replaced by a speaker and a circuit
to generate a pleasant ringing tone.
ولا تنسوني والمسلمين من صالح الدعاء وصلي الله وسلم وبارك علي النبي وآله وصحبه وإخوانه وسلم
بسم الله والحمد لله والصلاة والسلام علي رسول الله وآله وصحبه وإخوانه وسلم
Create Users, Home Folders, And set Permissions all in one script
Again back to our scripts, the following script not only ceates users but also creates home folders and grant users permissions over their home folders. Also the home folder will be mapped will be mapped automatically to driver Z:. the following video shows how to use the script.
Note: In the following video i had granted the "Everyone" a full control over the "HomeDir$", this may be a security hole, so you can replace the "Everyone" by the "Authenticated Users" group and only give them the "change" and "read" permissions not the full control. first download the script from the following link:
بسم الله والحمد لله والصلاة والسلام علي رسول الله وآله وصحبه وإخوانه وسلم
How To Configuring Fine-Grained Password Policies
Prior to Windows Server 2008, an Active Directory
administrator was only able to configure a single Password Policy and Account
Lockout Policy for any Active Directory domain. If you were faced with a subset
of users whose password policy requirements were different, you were left with
the choice of configuring a separate domain or forcing all users within the
domain to conform to a single password policy. Beginning in Windows Server
2008, you can configure Fine-Grained Password Policies, which allow you to
define multiple password policies within a single domain.
To enable Fine-Grained Password Policies, Windows Server
2008 introduces a new object type called msds-PasswordSettings, also
called a Password Settings Object (PSO). Each PSO has the
following mandatory attributes:
•
cn.
The common name for the PSO, such as "ServiceAccountNoLockout."
•
msDS-PasswordSettingsPrecedence. In a case where multiple PSOs apply, this
attribute of the PSO is used as a tie-breaker to determine which PSO should
apply: a PSO with a precedence of 1 will be applied over a PSO with a
precedence of 5, a PSO with a precedence of 10 will be applied over a PSO with
a precedence of 100, and so on.
•
msDS-PasswordReversibleEncryptionEnabled. This attribute indicates whether the PSO
allows passwords to be stored in Active Directory using reversible encryption.
This setting should only be enabled if a particular application requires it,
because it presents a significant security risk. Use “true” or “false”.
•
msDS-PasswordHistoryLength. This attribute indicates the number of
passwords that Active Directory should retain in memory before allowing someone
to reuse a previously used password. Setting this attribute to a value of
"2," for example, would prevent someone from reusing the previous two
passwords that they had configured for their user account. This setting
corresponds to the Enforce Password History setting in Group Policy.
•
msDS-PasswordComplexityEnabled. This attribute indicates whether the PSO
requires a complex password; that is, a password that uses a mixture of
uppercase and lowercase letters, numbers, and symbols. The default password
policy in Windows Server 2008 requires the use of complex passwords.
•
msDS-Minimum Password Length. This attribute indicates the minimum length
of a password defined by this PSO.
•
msDS-MinimumPasswordAge. This attribute is a negative number that indicates the number
of milliseconds old a password must be before it can be changed. The default value
is -864000000000, which equates to one day. It should be entered in the form
of:Days:Hours:Minutes:seconds
•
msDS-MaximumPasswordLength. As the name indicates, this attribute
identifies the maximum length of a password defined by this PSO.
•
msDS-MaximumPasswordAge. This attribute is a negative number that indicates in milliseconds
when a password will expire. The default value is —36288000000000, or 42 days.
It
should be entered in the form of: Days:Hours:Minutes:seconds
•
msDS-LockoutThreshold. This attribute indicates the number of bad login
attempts permitted before an account is locked out.
•
msDS-LockoutObservationWindow. This attribute is a negative number that
indicates the number of milliseconds that must pass before the counter for
failed logon attempts should be reset. It should be entered in the form of:
Days:Hours:Minutes:seconds, for example make it
2 minutes which is the default for the AD policy.
•
msDS-LockoutDuration. This attribute is a negative number expressed in
milliseconds that indicates how long an account will remain locked out. A value
of "0" indicates that the account will stay locked out until it is
manually unlocked by an administrator.
It should be entered in the form of: Days:Hours:Minutes:seconds, for example
make it 2 minutes which is the default for the AD policy.
Note:
The “msDS-LockoutObservationWindow” could not be
longer than the “msDS-LockoutDuration”. Also
the "msDS-MaximumPasswordAge" cannot be set to 00:00:00:00
You can create one or more
PSOs within a domain and then configure each PSO to apply to one or more user
or group accounts within the domain; these objects are not created using the
Group Policy Management Editor, but by manually creating the object using
ADSIEdit or LDIFDE. When a user logs on to the domain, Windows Server 2008 uses
the following steps to determine the user's effective password requirements:
1. Are one or more PSOs
assigned to the individual user account? If so, use the PSO that has the
winning precedence. If not, continue to step 2.
2. Are one or more PSOs
assigned to a group that has the user account as a member, either directly or
through nested group membership? If so, use the PSO that has the winning
precedence. If not, continue to step 3.
3. If PSOs are not assigned
to the user or to any group that has the user as a member, apply the
domain-wide password policy and account lockout requirements “Defined by Group
Policy”.
Configuration Example:
ولا تنسوني والمسلمين من صالح الدعاء وصلي الله وسلم وبارك علي النبي وآله وصحبه وإخوانه وسلم